Pytorch HPO 超参优化
超参优化是深度学习中的常见问题,有好多工具用于解决相关问题。其中,有一些博客对其做了比较好的综述,见这里:https://neptune.ai/blog/best-tools-for-model-tuning-and-hyperparameter-optimization。
总结如下:
https://docs.google.com/spreadsheets/d/e/2PACX-1vQQngvMHiqVNND4-pBHq-2_S4SfJFnBn1qg4V_RsnG28qBJ4EV3soATwpq-YaShLDz2437FcH11-JLp/pubhtml?gid=0&single=true Google Vizer, AWS Sage Maker, 和 Azure Machine Learning 付费不开源,可以忽略。
Scikit-Optimize 不支持 GPU,忽略。
比较剩余 4 个方法,发现 Optuna 和 Hyperopt 使用者不够广泛,忽略。
Ray Tune 和 NNI 相比,Ray Tune 支持 PyTorch 和其他常用的非深度学习工具,而 NNI 只支持深度学习工具。因此优先学习 Ray Tune。BTW, Ray Tune 也是 PyTorch 官方推荐,使用起来门槛更低些。 我主要是使用 Pytorch 训练模型。为了更快速的比较,会在 iBex 上做超参数的比较。为了更好的使用 iBex 资源,需要支持分布式计算。这些 NNI 都支持。而且比较了下 Ray Tune 和 NNI,NNI 功能强大,而且使用简单,因此使用 NNI。
NNI 使用
NNI 是 Microsoft 官方出品的一款调参工具。大厂出品,可以使用。试用完后的认知是 NNI 做 HPO 比较好。NAS 有些过于麻烦。尽可能用 HPO 完成自己所需的功能。
参考:https://www.microsoft.com/en-us/research/project/neural-network-intelligence/
NNI 分为了六个不同的功能:
超参优化,
网络结构搜索,
模型压缩,
特征工程。用 GBDT 评价特征重要性。
Quantization
One-shot NAS。
NNI 安装
pip install nni超参优化 HPO
NNI 提供一个 web portal 可以查看训练进度、查看结果、自定义超参数和管理 HPO 实验。
用户使用流程: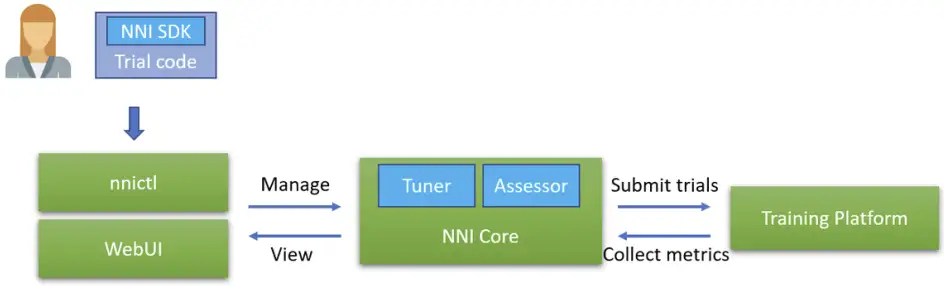

主要是使用 nnictl 来提交任务,用 WebUI 来做查看和管理。

配置实验 Experiment
NNI HPO 的核心配置都在 Experiment 中,包括 search space,tuner 和 web portal 端口。可以使用 Python 来配置,但更常用的是使用 nnictl。
初始化 experiment
from nni.experiment import Experiment
experiment = Experiment('local')
Experiment 设置
# Code & directory
experiment.config.trial_command = 'python model.py'
experiment.config.trial_code_directory = '.'

# Search space
experiment.config.search_space = search_space

# Tuner
experiment.config.tuner.name = 'TPE'
experiment.config.tuner.class_args['optimize_mode'] = 'maximize'

# No. of runs & concurrency
experiment.config.max_trial_number = 10
experiment.config.trial_concurrency = 2
运行 Experiment
experiment.run(8080)NNICTL 使用
# start
nnictl create --config tune_config.yaml -p 8081
# stop
nnictl stop --all
# view previous experiment
nnictl view --experiment_dir ~/nni-experiments/ g2ip3f5m  # id
tune_config 配置文件
tune_config 文件中,可以配置 search space 等很多参数。
searchSpace:
  l1_dim:
    _type: choice
    _value: [16, 32, 64, 128, 256, 512, 1024]
  l2_dim:
    _type: choice
    _value: [16, 32, 64, 128, 256, 512, 1024]
  l3_dim:
    _type: choice
    _value: [16, 32, 64, 128, 256, 512, 1024]
  l4_dim:
    _type: choice
    _value: [16, 32, 64, 128, 256]
  lr:
    _type: loguniform
    _value: [0.0000001, 0.1]

trialCommand: python tune_hparams.py --config configs/train_concatmodel_fps_dps.yaml
trialCodeDirectory: ./
trialGpuNumber: 2
trialConcurrency: 2

maxExperimentDuration: 24h
maxTrialNumber: 100
maxTrialNumPerGpu: 4
tuner:
  name: Anneal
  classArgs:
    optimize_mode: maximize

trainingService:
  platform: local
  useActiveGpu: True
定义搜索空间 search space
参数空间选项见页面:https://nni.readthedocs.io/en/stable/hpo/search_space.html。
包括:
+多选 choice {"_type": “choice”, “_value”: options}
随机整数 randint {"_type": “randint”, “_value”: [lower, upper]}
+平均分布 uniform {"_type": “uniform”, “_value”: [low, high]}
+指数平均分布 quniform {"_type": “quniform”, “_value”: [low, high, q]},例如 [0, 10, 2.5] 生成 [0, 2.5, 5.0, 7.5, 10.0],[2, 10, 5] 生成 [2, 5, 10]
对数平均分布 loguniform {"_type": “loguniform”, “_value”: [low, high]}
正态分布 normal {"_type": “normal”, “_value”: [mu, sigma]}
指数正态分布 qnormal {"_type": “qnormal”, “_value”: [mu, sigma, q]}
对数正态分布 lognormal {"_type": “lognormal”, “_value”: [mu, sigma]}
指对数正态分布 qlognormal {"_type": “qlognormal”, “_value”: [mu, sigma, q]} 不同的 tuner 支持的 search space 类型是有差异的,需要在设置时候注意下。
可以使用 config 文件来配置,也可以单独配置。
search_space = {
    'features': {'_type': 'choice', '_value': [128, 256, 512, 1024]},
    'lr': {'_type': 'loguniform', '_value': [0.0001, 0.1]},
    'momentum': {'_type': 'uniform', '_value': [0, 1]},
}
获取下一步的参数
import nni

params = {'features': 512, 'lr': 0.001, 'momentum': 0,}
optimized_params = nni.get_next_parameter()
params.update(optimized_params)
Tuner 优化器
参考:https://nni.readthedocs.io/en/stable/hpo/tuners.html
Tuner 中实现了如下的功能:
space = get_search_space()
history = []
while not experiment_end:
    hp = suggest_hyperparameter_set(space, history)
    result = run_trial(hp)
    history.append((hp, result))
在 NNI 中,有 13 类 Tuner。其中包括:
基础(Basic)类的:Random 随机搜索,Grid Search 网格搜索,Batch 批运行。
启发(Heuristic)类的:Anneal 退火算法,Evolution 进化算法,Hyperband 算法,PBT 算法。
贝叶斯(Bayesian)类的:TPE 算法,SMAC 算法,Metis 算法,BOHB 算法,GP 算法 和 DNGO 算法。 从官方提供的案例1来看:
在回归 (regression) 任务中 Aneal > Random > Evolution > DNGOTuner > SMAC > TPE > GPTuner > MetisTuner。
在分类 (classification) 任务中 SMAC > GPTuner > Evolution > Anneal > MetisTuner > TPE > Random >= DNGOTuner。
定义优化的参数
class NeuralNetwork(nn.Module):
    def __init__(self):
        ...
        self.linear_relu_stack = nn.Sequential(
            nn.Linear(28*28, params['features']), # model params
            nn.ReLU(),
            nn.Linear(params['features'], params['features']),
            nn.ReLU(),
            nn.Linear(params['features'], 10)
        )
   ...

optimizer = torch.optim.SGD(model.parameters(), lr=params['lr'],
            momentum=params['momentum'])  # optimizer params
定义 train 和 test 函数
需要 model 和 optimizer 能调用 parms 即可,无需增加其他内容。
def train(dataloader, model, loss_fn, optimizer):
    size = len(dataloader.dataset)
    model.train()
    for batch, (X, y) in enumerate(dataloader):
        X, y = X.to(device), y.to(device)
        pred = model(X)
        loss = loss_fn(pred, y)
        optimizer.zero_grad()
        loss.backward()
        optimizer.step()

def test(dataloader, model, loss_fn):
    size = len(dataloader.dataset)
    num_batches = len(dataloader)
    model.eval()
    test_loss, correct = 0, 0
    with torch.no_grad():
        for X, y in dataloader:
            X, y = X.to(device), y.to(device)
            pred = model(X)
            test_loss += loss_fn(pred, y).item()
            correct += (pred.argmax(1) == y).type(torch.float).sum().item()
    test_loss /= num_batches
    correct /= size
    return correct
模型训练和结果报告
需要 model 和 optimizer 能调用 params 即可,无需增加其他内容。
epochs = 5
for t in range(epochs):
    print(f"Epoch {t+1}\n-------------------------------")
    train(train_dataloader, model, loss_fn, optimizer)
    accuracy = test(test_dataloader, model, loss_fn)
    nni.report_intermediate_result(accuracy)
nni.report_final_result(accuracy)
网络架构搜索 NAS
参考:https://nni.readthedocs.io/en/stable/nas/overview.html
Neural Architecture Search 是 DL 最常见、也最核心的问题。
常见的有三个核心点:
搜索策略 exploration strategy,提供了一系列 strategy。
性能评估 performance estimation,通过 evaluator 抽象实现。

定义搜索空间
定义搜索空间相关的 API。NAS 在 torch.nn 的基础上抽象了一层,方便定义搜索空间。实际上是否有效需要测试。
常见的API 包括:
| Name | Category | Brief Description |
|---|---|---|
| LayerChoice | Mutation Primitives | Select from some PyTorch modules |
| InputChoice | Mutation Primitives | Select from some inputs (tensors) |
| ValueChoice | Mutation Primitives | Select from some candidate values |
| Repeat | Mutation Primitives | Repeat a block by a variable number of times |
| Cell | Mutation Primitives | Cell structure popularly used in literature |
| NasBench101Cell | Mutation Primitives | Cell structure (variant) proposed by NAS-Bench-101 |
| NasBench201Cell | Mutation Primitives | Cell structure (variant) proposed by NAS-Bench-201 |
| AutoActivation | Hyper-modules Library | Searching for activation functions |
| Mutator | Mutator | Flexible mutations on graphs. See tutorial here |
定义基础模型示例
import torch
import torch.nn.functional as F

import nni.retiarii.nn.pytorch as nn
from nni.retiarii import model_wrapper

class DepthwiseSeparableConv(nn.Module):
    def __init__(self, in_ch, out_ch):
        super().__init__()
        self.depthwise = nn.Conv2d(in_ch, in_ch, kernel_size=3, groups=in_ch)
        self.pointwise = nn.Conv2d(in_ch, out_ch, kernel_size=1)
    def forward(self, x):
        return self.pointwise(self.depthwise(x))

@model_wrapper      # this decorator should be put on the out most
class Net(nn.Module):
    def __init__(self):
        super().__init__()
        self.conv1 = nn.Conv2d(1, 32, 3, 1)  # use nn from nni
        # LayerChoice to select Conv2d or DwConv.
        self.conv2 = nn.LayerChoice([
            nn.Conv2d(32, 64, 3, 1),
            DepthwiseSeparableConv(32, 64)
        ])
        # ValueChoice  to select a dropout rate.
        self.dropout1 = nn.Dropout(nn.ValueChoice([0.25, 0.5, 0.75]))
        self.dropout2 = nn.Dropout(0.5)
        feature = nn.ValueChoice([64, 128, 256])
        self.fc1 = nn.Linear(9216, feature)
        self.fc2 = nn.Linear(feature, 10)
    def forward(self, x):
        x = F.relu(self.conv1(x))
        x = F.max_pool2d(self.conv2(x), 2)
        x = torch.flatten(self.dropout1(x), 1)
        x = self.fc2(self.dropout2(F.relu(self.fc1(x))))
        output = F.log_softmax(x, dim=1)
        return output

model_space = ModelSpace()
model_space
定义搜索策略
有两种类型的搜索策略:multi-trial 和 one-shot。multi-trial 每个模型单独初始化并运行,而 one-shot 是训练一个 supernet,可以减小计算成本。但是 one-shot 支持的 mutation 类型较少,并不支持自定义mutation。
| Name | Category | Brief Description |
|---|---|---|
| Random | Multi-trial | Randomly sample an architecture each time |
| GridSearch | Multi-trial | Traverse the search space and try all possibilities |
| RegularizedEvolution | Multi-trial | Evolution algorithm for NAS. Reference |
| TPE | Multi-trial | Tree-structured Parzen Estimator (TPE). Reference |
| PolicyBasedRL | Multi-trial | Policy-based reinforcement learning, based on implementation of tianshou. Reference |
| DARTS | One-shot | Continuous relaxation of the architecture representation, allowing efficient search of the architecture using gradient descent. Reference |
| ENAS | One-shot | RL controller learns to generate the best network on a super-net. Reference |
| GumbelDARTS | One-shot | Choose the best block by using Gumbel Softmax random sampling and differentiable training. Reference |
| RandomOneShot | One-shot | Train a super-net with uniform path sampling. Reference |
| Proxyless | One-shot | A low-memory-consuming optimized version of differentiable architecture search. Reference |
搜索策略示例
import nni.retiarii.strategy as strategy
search_strategy = strategy.Random(dedup=True)
定义性能评估 evaluator
nni 支持了 pytorch lightning 的一些功能,方便调用。也可以用自己写的函数。
定义 train 函数
定义 train 函数,并记录相关的 metric。(没有 checkpoint?)
import nni

from torchvision import transforms
from torchvision.datasets import MNIST
from torch.utils.data import DataLoader

def train_epoch(model, device, train_loader, optimizer, epoch):
    loss_fn = torch.nn.CrossEntropyLoss()
    model.train()
    for batch_idx, (data, target) in enumerate(train_loader):
        data, target = data.to(device), target.to(device)
        optimizer.zero_grad()
        output = model(data)
        loss = loss_fn(output, target)
        loss.backward()
        optimizer.step()
        if batch_idx % 10 == 0:
            print('Train Epoch: {} [{}/{} ({:.0f}%)]\tLoss: {:.6f}'.format(epoch, batch_idx * len(data), len(train_loader.dataset), 100. * batch_idx / len(train_loader), loss.item()))

def test_epoch(model, device, test_loader):
    model.eval()
    test_loss = 0
    correct = 0
    with torch.no_grad():
        for data, target in test_loader:
            data, target = data.to(device), target.to(device)
            output = model(data)
            pred = output.argmax(dim=1, keepdim=True)
            correct += pred.eq(target.view_as(pred)).sum().item()

    test_loss /= len(test_loader.dataset)
    accuracy = 100. * correct / len(test_loader.dataset)

    print('\nTest set: Accuracy: {}/{} ({:.0f}%)\n'.format(
          correct, len(test_loader.dataset), accuracy))

    return accuracy

def evaluate_model(model_cls):
    # "model_cls" is a class, need to instantiate
    model = model_cls()

    device = torch.device('cuda') if torch.cuda.is_available() else torch.device('cpu')
    model.to(device)

    optimizer = torch.optim.Adam(model.parameters(), lr=1e-3)
    transf = transforms.Compose([transforms.ToTensor(), transforms.Normalize((0.1307,), (0.3081,))])
    train_loader = DataLoader(MNIST('data/mnist', download=True, transform=transf), batch_size=64, shuffle=True)
    test_loader = DataLoader(MNIST('data/mnist', download=True, train=False, transform=transf), batch_size=64)

    for epoch in range(3):
        train_epoch(model, device, train_loader, optimizer, epoch)
        accuracy = test_epoch(model, device, test_loader)
        # report intermediate result. Result can be float or dict
        nni.report_intermediate_result(accuracy)

    nni.report_final_result(accuracy)
创建 evaluator
from nni.retiarii.evaluator import FunctionalEvaluator
evaluator = FunctionalEvaluator(evaluate_model)
提交 NAS 实验 (experiment)
from nni.retiarii.experiment.pytorch import RetiariiExperiment, RetiariiExeConfig

exp = RetiariiExperiment(model_space, evaluator, [], search_strategy)
exp_config = RetiariiExeConfig('local')
exp_config.experiment_name = 'mnist_search'

exp_config.max_trial_number = 4   # spawn 4 trials at most
exp_config.trial_concurrency = 2  # will run two trials concurrently

exp_config.trial_gpu_number = 1
exp_config.training_service.use_active_gpu = True

exp.run(exp_config, 8081)  # 提交 NAS experiment
导出最佳模型
for model_dict in exp.export_top_models(formatter='dict'):
    print(model_dict)
# {'model_1': '0', 'model_2': 0.25, 'model_3': 64}
输出的 json 对象会记录一些输出结果。
NAS 和 pytorch lightning 联用
定义 evaluator
import nni.retiarii.evaluator.pytorch.lightning as pl
from torchvision import transforms

transform = nni.trace(transforms.Compose, [nni.trace(transforms.ToTensor()), nni.trace(transforms.Normalize, (0.1307,), (0.3081,))])
train_dataset = nni.trace(MNIST, root='data/mnist', train=True, download=True, transform=transform)
test_dataset = nni.trace(MNIST, root='data/mnist', train=False, download=True, transform=transform)

# pl.DataLoader and pl.Classification is supported.
evaluator = pl.Classification(train_dataloaders=pl.DataLoader(train_dataset, batch_size=100),
                              val_dataloaders=pl.DataLoader(test_dataset, batch_size=100),
                              max_epochs=10)
定义模型
from nni.retiarii.evaluator.pytorch.lightning import LightningModule

@nni.trace
class AutoEncoder(LightningModule):
    def __init__(self):
        super().__init__()
        self.decoder = nn.Sequential(
            nn.Linear(3, 64),
            nn.ReLU(),
            nn.Linear(64, 28*28)
        )

    def forward(self, x):
        embedding = self.model(x)  # let's search for encoder
        return embedding

    def training_step(self, batch, batch_idx):
        # training_step defined the train loop.
        # It is independent of forward
        x, y = batch
        x = x.view(x.size(0), -1)
        z = self.model(x)  # model is the one that is searched for
        x_hat = self.decoder(z)
        loss = F.mse_loss(x_hat, x)
        # Logging to TensorBoard by default
        self.log('train_loss', loss)
        return loss

    def validation_step(self, batch, batch_idx):
        x, y = batch
        x = x.view(x.size(0), -1)
        z = self.model(x)
        x_hat = self.decoder(z)
        loss = F.mse_loss(x_hat, x)
        self.log('val_loss', loss)

    def configure_optimizers(self):
        optimizer = torch.optim.Adam(self.parameters(), lr=1e-3)
        return optimizer

    def on_validation_epoch_end(self):
        nni.report_intermediate_result(self.trainer.callback_metrics['val_loss'].item())

    def teardown(self, stage):
        if stage == 'fit':
            nni.report_final_result(self.trainer.callback_metrics['val_loss'].item())
创建 experiment
import nni.retiarii.evaluator.pytorch.lightning as pl
from nni.retiarii.experiment.pytorch import RetiariiExperiment

lightning = pl.Lightning(AutoEncoder(),
                         pl.Trainer(max_epochs=10),
                         train_dataloaders=pl.DataLoader(train_dataset, batch_size=100),
                         val_dataloaders=pl.DataLoader(test_dataset, batch_size=100))
experiment = RetiariiExperiment(base_model, lightning, mutators, strategy)
模型压缩
训练好的模型,如果要在一个更小的资源上运行,需要对其做压缩减小运行时候的成本。